Taking Pictures of the Sky
Steven Dutch, Professor Emeritus, Natural and Applied Sciences, University of Wisconsin - Green Bay
Basic Kinds of Cameras
Simple film cameras, like disposables, are simple point and shoot affairs. They have at most very simple controls like near and far distance, bright or dim light, and so on. Mostly they rely on the film having a wide exposure latitude that enables it to get tolerably decent pictures even if the scene is quite a bit brighter or darker than normal. These will serve only for daylight photography, rainbows, sunsets, and so on. The Sun and Moon come out as tiny dots on the pictures.
Advanced film cameras have separate settings for distance, aperture (lens opening), exposure time, and so on. Usually they have light meters to help with exposure. You will have to spend time practicing and reading the manual to get the most effective use from these cameras. The most advanced models, single lens reflex cameras, allow you to view through the lens so you see exactly what the picture will look like. Most single lens reflex cameras allow you to exchange lenses for different purposes.
Simple digital cameras. Even the simplest digital cameras offer far more control than many film cameras. The view screen shows exactly what the camera sees, there is automatic exposure and, usually, zoom and auto-focus. There may be settings for various light conditions like snow, deep shade, or night. Downsides are that many lack time exposure capability, and auto-focus may work poorly when photographing the sky.
Advanced digital cameras offer most of the best features of advanced film cameras, The most advanced (and expensive) are almost exactly like single lens reflex cameras for film, and even have interchangeable lenses. A downside to less advanced digital cameras is that the controls don't work exactly the same as on film cameras, meaning the user has to spend a fair amount of time mastering the controls to get most effective use out of the camera.
Cell phone cameras, affectionately called crap-cams in some circles, are very low end digital cameras. Controls are minimal and any motion at all results in a blurry picture. That may be a blessing if it means your embarrassing pictures on Facebook are too blurry for the police or prospective employers to identify you. The cardinal rule is to hold the phone absolutely still and do not move it until you see the image appear in the viewer. They have the virtue of being ubiquitous, meaning you always have a camera handy for unexpected events, but they are not a substitute for a good camera for serious photography. Plus, if you take a cell phone out of the U.S. to use as a camera, you could accidentally rack up some whopping roaming fees. But they are way better than nothing, and I've gotten some decent pictures of unexpected events. Since this was origibnally written they have improved enormously in quality.
The Most Important Rule
Experiment
Try various settings and zoom levels and get proficient before something important comes along. During a Space Station flyover is not the time to figure out how to take a time exposure. Digital photographs are free, so if you don't get what you want, just erase the picture.
(Digital photos are virtually free, but everything wears out. My experience is that good cameras last about 10,000-15,000 shots before wearing out, and I have worn out a number. A few dozen practice shots as the price for getting many more good pictures is worth it.)
Simple Things
Daytime pictures of interesting things in the sky, like rainbows, unusual clouds, and so on, are no different from any other kind of picture and can be taken the same way. Just aim the camera and shoot. Things in the direction of the sun, like halos, are trickier. Photos taken with simple film cameras are likely to be overexposed (too light) while photos taken with automatic exposure may be overwhelmed by the sun and come out too dark. The great thing about digital cameras is you can experiment at no cost, and try different exposure settings and camera angles. In science, you can never take too many pictures.
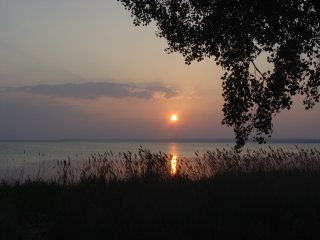
Sunset colors (and sunrise, for those of you who may have wondered where the Sun comes from) are pretty much like daytime pictures. However, as the sky gets darker, exposure times get longer. A rough rule of thumb is that hand-held exposures should be less than 1/30 second, and that longer exposures require a tripod. It is possible to get fairly decent pictures with longer hand-held exposures if you hold the camera very steady. A good practice with all digital cameras is to hold the camera steady until the picture appears on the view screen.
 |
 |
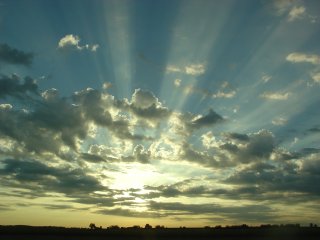 |
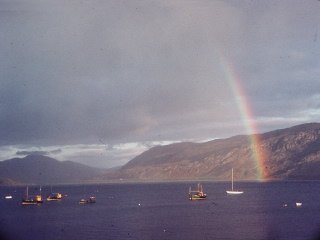
All of these pictures were taken like any other photograph. Above: Rainbows Left: Crepuscular Rays |
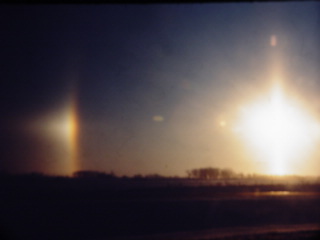 |
Shooting into the Sun, like this picture of a brilliant sun halo, is a bit tricky. Expose the Sun correctly and everything else is too dark. Expose the foreground correctly, and the Sun washes the sky out completely. Since the halo was the object of interest, that's what I set the exposure for. |
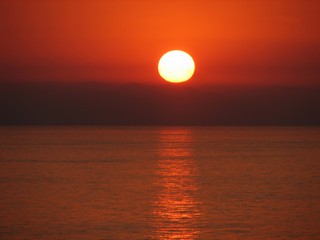 |
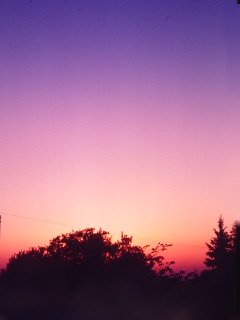
The setting Sun is normally dimmed by the atmosphere and sunrise or sunset pictures are not much different from any other picture. This is a telephoto shot. |
 |
Sulfuric acid droplets from large volcanic eruptions often give the twilight sky a distinctive magenta hue. This picture was taken after sunset. Since exposure time might be a bit long, it's especially important to hold the camera steady. |
 |
Photographing the Sun and Moon with an ordinary camera is useless except for scenic shots like sunsets or moonrises. Both the Sun and Moon will be too tiny to see any detail - they will be mere dots. If your scene spans 60 degrees, the Sun or Moon, only 1/2 degree in diameter, will be only 1/120 the width of the picture. You need a telephoto lens or telescope to get detailed pictures of the Moon or Sun (photographing the Sun requires stringent safeguards). Photographing the planets requires a telescope and advanced equipment. |
Night Views of the Sky
To take views of the night sky you will need a camera capable of taking long exposures (time exposures) and a tripod. You simply cannot hold a camera steady enough by hand. This means you will need a fairly good camera with controls for exposure time. On film cameras, the setting for time exposures is labeled "B," for "bulb." (It's a holdover from the days when photographers would open the shutter using a release triggered by squeezing a rubber bulb.) When the camera is set on "B", the shutter will stay open as long as the button is depressed.
Virtually all digital cameras limit time exposures to 30 seconds or less, but that's enough to capture stars fainter than you can see with the unaided eye. The time limit is dictated by random noise in the imaging chips.
Constellations are easy to photograph with 15-30 second time exposures. Just set the exposure length, aim the camera, and press the button. At least some bright stars will probably show up in the view finder, or you can sight over the top of the camera to get an approximate alignment. Digital cameras allow you to see the results right away, so you can correct any mis-aimed shots. Foreground objects like trees, buildings, or the horizon will make a more attractive picture, but try to avoid bright lights.
 |
A view of the Southern Cross from Costa Rica. Most of these pictures were processed in various ways to enhance the stars. |
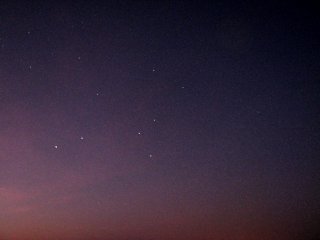
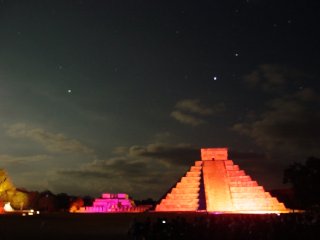 |
Stars over Chichen Itza, Yucatan. The bright star over the pyramid is Sirius and the bright star to the left center is Canopus. |
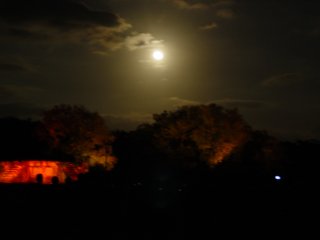 |
Moonrise over the forest at Chichen Itza. A picture like this needs to be long enough to capture foreground detail but not so long that the Moon wipes out everything else. An exposure of a second or two will do, short enough that bracing the camera on a firm surface may suffice. |
 |
The Southern Cross (center - the fourth star is very faint) with Alpha and Beta Centauri to the left, in morning twilight off the Panama Canal. Ships are lousy places for star-gazing and sky photography because they are brilliantly lit and always moving, even if they feel steady. |
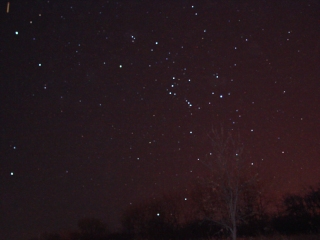 |
View of Orion rising. The reddish color is from streetlights. |
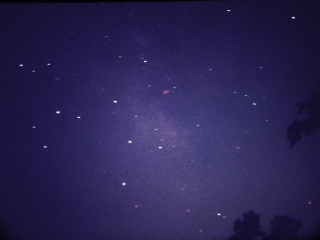 |
The detail even a simple photo can capture can be amazing. At left center is the constellation Sagittarius, its brightest stars outlining a teapot. The fuzzy patch dead center (just above the "spout") is the Milky Way and the pink object above that is a bright nebula. |
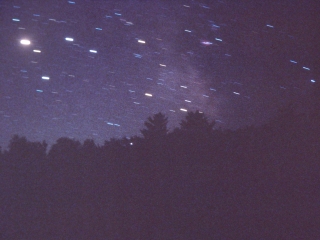 |
An exposure of a couple of minutes shows noticeable trailing of the stars. This is Sagittarius setting below trees. The very bright object at far left is Jupiter. |
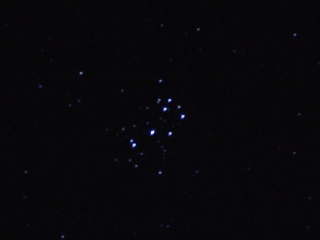 |
A short exposure (15 seconds) of the Pleiades, magnified. There is a little trailing but not enough to be annoying. |
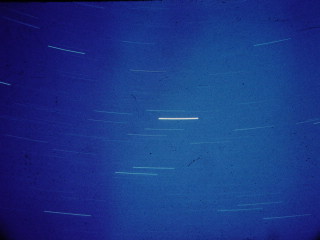 |
This is how much stars trail in 15 minutes. This was obviously taken with a film camera. |
The rotation of the earth causes the stars to appear to move across the sky, so your star images will be short trails. For exposures of 30 seconds or less, it's not noticeable unless you zoom in closely on a star when viewing the picture.
| Bright Comets like Comet Hale-Bopp can be photographed just like constellations. Hale-Bopp predated widespread digital photography by just a little. This is a 30-second exposure. Unfortunately, bright comets come along only once a decade or so and comets visible in a dark sky, just a few times per century. | 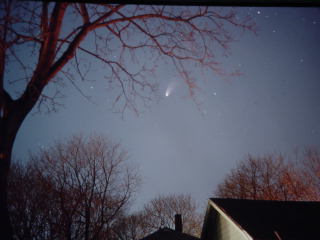 |
| Comet PanSTARRS in 2013 was perhaps the first easily observable comet in the Northern Hemisphere since the advent of digital photography. The comet, easy in binoculars but barely visible to the eye, is near the top, left of center. PanSTARRS was named for the automated surveillance system that detected it. | 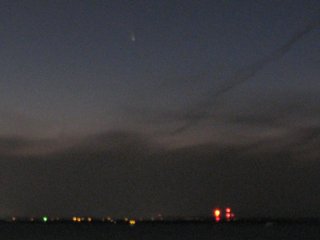 |
| A telephoto shot of Comet PanStarrs. The grainy texture resulted from setting the film speed for ISO 1600. The high speed allowed an exposure of just a couple of seconds with minimal trailing, even at this magnification, but at the price of a grainy texture. If you experiment with different speed settings, take test exposures and examine them closely. | 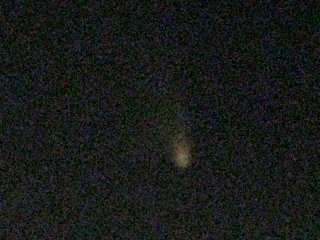 |
| The Aurora is easy to photograph the same way you photograph constellations. If the display is rapidly moving, you may want to limit exposure to just a few seconds. | 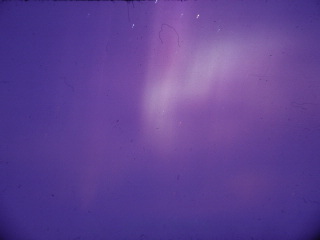 |
| Satellites are so numerous that you have a good chance of catching one in a random sky shot. The International Space Station can be as bright as Venus. Numerous other satellites are fairly easy to see with the unaided eye. Since satellites move quickly, a time exposure of a few seconds will show them as a trail. | 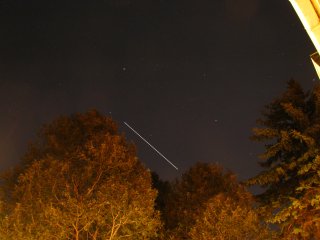 |
| Satellites move much faster than stars, so the light from a satellite spends much less time passing over a spot on your imaging chip or film than light from a star. A time exposure of a satellite will be a long streak, but fainter than the trail of a comparably bright star would be. These two pictures are of the International Space Station. Foreground objects make the results more interesting and provide orientation and scale. | 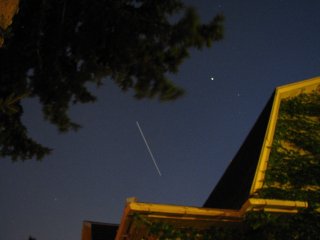 |
| The Space Shuttle Atlantis (the long streak at top left). The long time exposure makes the sky light blue even though it was well after sunset. | 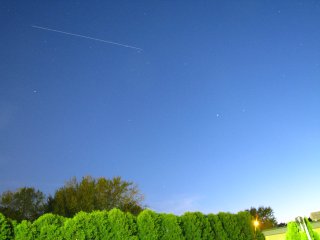 |
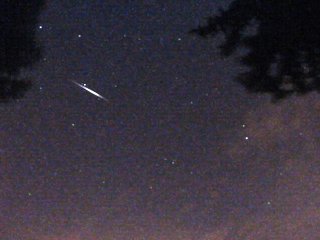
| A fleet of communications satellites called Iridium has solar panels that reflect brilliant but short (several seconds) bursts of light. A great site for predictions of satellite passes is www.heavens-above.com. The site does take some skill to use. You have to be able to find direction in the sky and input your location and time zone. The Iridium flare is the short bright streak. [Alas, the Iridum flashes no longer occur.] With Iridium flares, don't wait for the satellite to reach peak brightness. As soon as it becomes visible to the eye, press the button. |
 |
| Aircraft will leave trails on photographs, too. Mostly they just detract from the image, but occasionally they add interest. Here is a triple grouping of Venus (brightest), Jupiter (below Venus) and Mars (very faint, to the left of Venus) with a trail made by an aircraft taking off. | 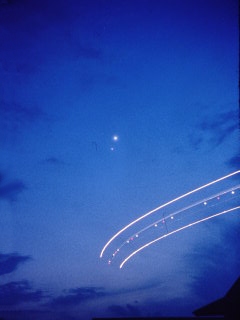 |
Meteors are most likely to be captured while you're shooting something else. Meteor "showers" are generally disappointing to beginners and most pictures you try to take won't capture a meteor.
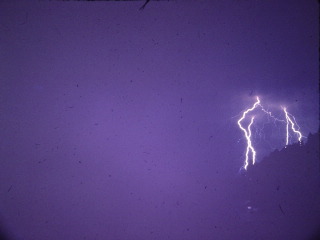
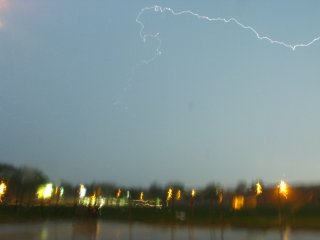
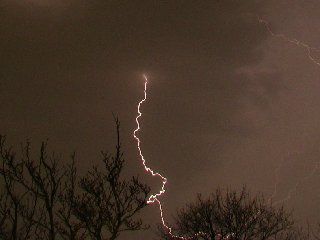
| Lightning is not really astronomical, but makes for spectacular photos. Just aim your camera where the action is and start taking time exposures. If there is a lot of artificial light, it's best to keep the exposures short. Lightning bolts are short, so lengthening the time exposure won't make them brighter, though it may improve the chances of catching more than one. Also, lighting bolts can last a few seconds, so pressing the button as soon as you see lightning may capture a bolt. Do your photography from a safe place, preferably indoors or inside a car. | 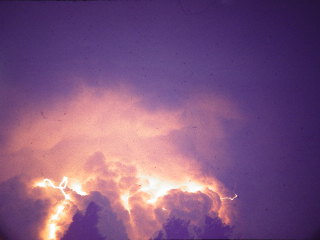 |
 |
|
| This is a 15-second time exposure braced on the steering wheel of a car. Because the camera wasn't perfectly steady, the scene is blurred. Notice, though, that the lightning is sharp, because it only lasted a fraction of a second. Below: with a digital camera and a tripod, and a serious thunderstorm, you can get good pictures. Set for the longest time exposure you've got and just keep pressing the button. |
 |
 |
 |
Some Mechanics
You absolutely need a tripod for these pictures. You can use a full-size tripod, which you need anyway if you hope to take serious pictures, but you can also get compact tripods that you can set up on a table top, car hood, or other surface.
Be careful starting your time exposure, because it can be very easy to jerk the camera and mar the shot. One good way to avoid this problem is to hold a black piece of paper in front of (and not touching) the camera, press the button, then quickly remove the paper. Better, if your camera allows it, is a remote shutter release. For film cameras with the "B" setting, a remote shutter release is a short cable with a plunger. One end screws into the hole atop the shutter button (so that's what it's for!). There is usually a small screw you can tighten to hold the shutter open. Failing that, a rubber band around the camera will do the trick. Most lower end digital cameras have no provision for remote shutter release.
One other strategy for avoiding initial camera motion is to use the self-timer if your camera has one. Most will, because portraits are such popular topics. Aim the camera, start the self timer and then get away from the camera.
Planets, Moon and Sun
Don't even think about trying to photograph these without a tripod.
Aim your camera at what you want to capture and zoom in as far as possible. Most cameras have two kinds of zoom. Optical zoom means the actual image in the camera gets bigger. Digital zoom is a way of blowing up the image mathematically without actually increasing detail. Try both to see which gives the best results.
Planets. The only planet you have any chance of capturing is Venus, and then only when it's at its largest during its crescent phase. Use maximum zoom. Take a time exposure, and block the lens with black paper. Every few seconds, whisk the paper away briefly and then cover the lens again. With luck you may get several crescent images because Venus will move between exposures.
The Moon is both easy and hard to photograph. Easy, because it's bright, hard because auto-focus and auto-exposure may interfere with you. If you can set the camera manually, do it. Try very short exposures, starting at, say, 1/100 second and getting longer until you achieve the desired results. Remember, digital photographs are virtually free. Use maximum zoom. One especially pleasing effect occurs at crescent Moon, when light from the Earth illuminates the dark side of the Moon. The problem here is that you need a long exposure to capture the so-called earthshine, but that will also overexpose the bright part of the Moon. Again, try various exposure times. Also, try shooting in twilight when there is still some light in the sky. The bright sky will help create better exposure balance, plus it makes for a prettier picture.
Eclipses of the Moon are not hard. The partial phases are just like any other Moon photographs. Totality will require exposures of a second or so. Use the black paper masking method, set the time exposure for a few seconds, and briefly whisk the paper away. It may also pay to zoom out if the totally eclipsed Moon is near a bright star or planet.
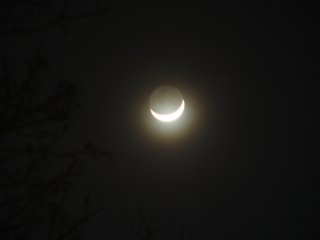 |
One especially pleasing effect occurs at crescent Moon, when light from the Earth illuminates the dark side of the Moon. The problem here is that you need a long exposure to capture the so-called earthshine, but that will also overexpose the bright part of the Moon. Again, try various exposure times. Also, try shooting in twilight when there is still some light in the sky. The bright sky will help create better exposure balance, plus it makes for a prettier picture. |
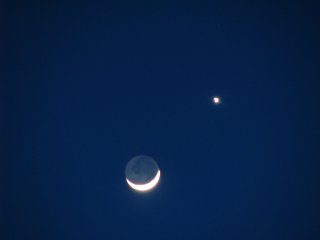 |
Crescent moon and Venus, with earthshine. The blue sky makes for a more pleasing photo. |
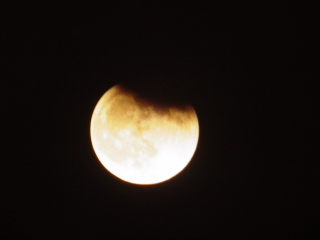 |
Partially eclipsed Moon |
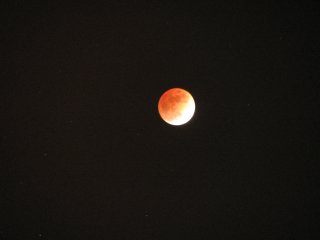 |
Totally eclipsed Moon. During totality exposures of a second or so may be needed. |
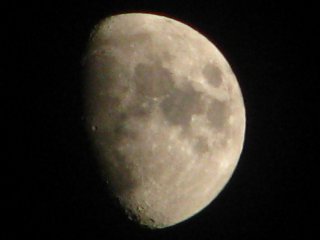 |
Although digital zoom isn't as good as optical zoom, it can still be surprisingly good. This is 48x digital zoom, 1/500 second. Numerous craters are clearly visible. |
The Sun requires serious precautions. Never look directly at the Sun without proper eye protection, and if you don't know exactly what proper eye protection is, don't try it at all.
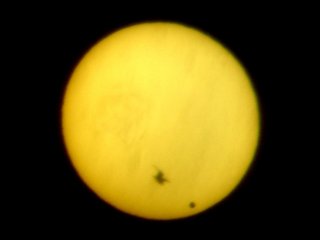
The good news is you cannot harm your eyes by looking at the Sun in a digital camera view screen (not a regular optical camera viewfinder!) The bad news is you can fry your camera's electronics and ruin the imaging chip. Use a dark filter. Welder's glass filters are very effective but also dark green. Several sheets of aluminized Mylar or a dark piece of photographic film will also work. Some of these may not be safe for viewing by eye. Zoom out to a wide angle view, find the Sun in your view screen, then zoom in on it. The most interesting thing to capture on the everyday Sun are sunspots. You won't get pictures of the other fascinating things on the Sun with an ordinary camera. Eclipses can be photographed using the same methods.
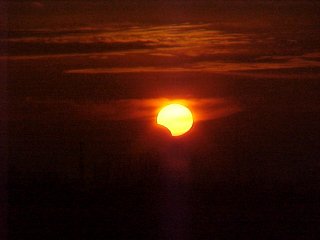 |
Partial eclipse of the Sun. Since this was near sunset, it could be captured like any other sunset photo. |
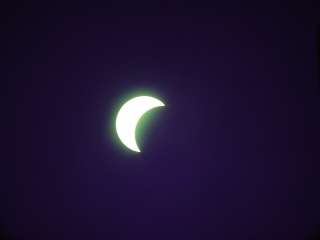 |
Partial eclipse of the Sun through Welder's glass. Note the green color. Adding a red filter will reduce the brightness still more, plus bring the color more toward yellow. |
 |
Transit of Venus, June 4, 2004, taken through the eyepiece of a telescope, using aluminized Mylar filter. The pelican was a lucky accident. |
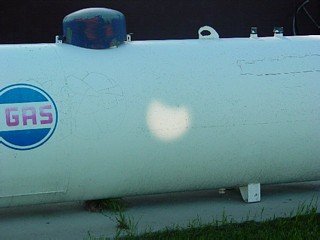 |
A huge improvement on the pathetic pinhole cameras recommended for eclipse viewing is to use a small mirror to project the Sun onto a convenient surface. If the distance to the surface is 100 times or more the diameter of the mirror, a nice image results. Here is a partial eclipse of the Sun projected onto a convenient white surface (and no, the gas tank was in no danger whatsoever). |
A total eclipse of the Sun - you should be so lucky - is more like photographing the Moon. You can look directly at the totally eclipsed sun safely. But you only have a couple of minutes to get it right and it will be a long time before you get another chance (or a lot of money for a plane ticket). The last total eclipse in the U.S. was in 2017 after an unusually long dry spell and the next will be in 2024. You need meticulous planning to get the best results. This is emphatically not the time to try to figure out how your camera works!
NeverNeverNeverNeverNeverNeverNever - Ever try to look directly at the Sun through telescopes, binoculars, or even a camera viewfinder without proper eye protection, and if you don't know exactly what that is, don't try it.
Through a Telescope
It is possible to take pictures through a telescope, in fact, it's far easier now with digital photography because it's easy to achieve proper focus. The best object to attempt is the Moon. Center the Moon in the field of view, then hold the camera up to the eyepiece and focus the image. With a little practice you can capture craters. Planets, galaxies, and other small or faint objects require specialized equipment.
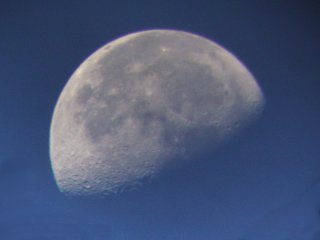 |
Photo of the Moon taken through the eyepiece of a telescope |
|
Transit of Venus, June 4, 2004, taken through the eyepiece of a telescope. The pelican was a lucky accident. |
Processing
Many digital photos of the sky require some processing to bring out their best features. A raw digital image of the sky taken from a dark location may look completely black. The star images are so tiny they may only cover a few pixels. Digital pictures can be improved using programs like Paint Shop Pro or Photoshop. Some of the things you may want to do include:
- Changing brightness and contrast. This can bring out the stars and lighten the sky a bit. Generally, simply making the picture brighter makes it look washed out, so usually increasing brightness requires increasing contrast as well.
- Changing color balance. City lights can make the sky reddish, but most image processing programs will allow you to decrease the amount of red to get a more natural looking sky.
- Emphasizing bright areas (called "dilate" in some programs) makes stars larger and easier to see. Most of the star and satellite photos above were dilated to make stars and satellite trails easier to see on small images.
- Removing defects: aircraft lights, unwanted foreground objects, edge glare from lights outside the field of view, and so on.
Return to Professor Dutch's Home Page
Created 16 June 2009, Last Update 17 January 2020